
Hi Key Bunch Readers!!!
My name is Deepika. It’s a great pleasure to do this tutorial for the Keybunch. I really appreciate Rekha and Sharon for taking interest in my work and giving me this opportunity to show my work on their creative blog. Today I am doing a tutorial on recycle art. There is a pleasure in creating something out of nothing. This work is totally inspired by that. Hope you all like it.

Things you need: Acrylic colour, brush, pen, 2 empty can of Pepsi or coke (cut the can), some clips of the can, push pin, thread.
Step 1:

The below figure shows, “how it will look like from the other side…”

Once the figure is done you can add details. I draw some straight and wavy lines to finish the design as you can see in picture.

Step 2: Add some more details with the help of push pin as shown in above picture.

Follow the same thing on the other sheet too.

Step 3: Add the opening clips with the help of thread as you can see in the picture.

Step 4: Now paint the blank area of the sheet with black acrylic colour.
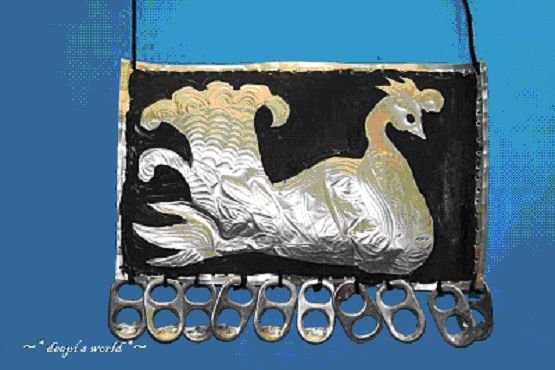
Step 5: Add the second sheet to the first one with the help of thread; your recycle art is ready.
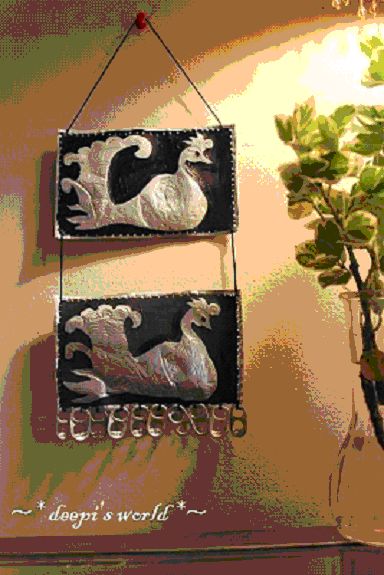
Hope you enjoyed the tutorial, Deepika has a lovely home too. The house tour will follow shortly. Deepika blogs at Deepi’s World and has some wonderful tutorials, do check them out.


Oh my goodness me! That is totally incredible and creative! Who would have thought to do that??? WOW!
BIG fan of Deepika's work…she is soooo talented! Looking fwd to her home-tour! 🙂
Wow, this is amazing. Sorry Sharon, I leave for Delhi in a few days No geting time to take pictures of my kitchen or blog. Will join the next party!!
Yes yes yes, me like a lot! Wooooow!
Agneta
Her work looks like embossed metal and yet its so easy! All those unnecessary childhood yrs I spent in metal embossing art classes getting boils from working with a chisel on my thumb 🙁
same as Divya…It took me right back to those classes..khat khat khat all day my mom would say:) what a pretty wall art!
Rekha: we missed you!
Thank you Rekha.
Thank you everyone for your lovely comments…glad that you like it.
What an ingeneous idea!! love it !
too good..
This looks so simple and easy to do, and looks absolutely beautiful. Really loved it , got to try it out. Thanks for such innovative piece of art.
SO creative! Loved it 🙂
wow!! thats a genius at work.. Im sure.. even if I tried.. the end result would look nothing like this.. Well done.. Deepika!!