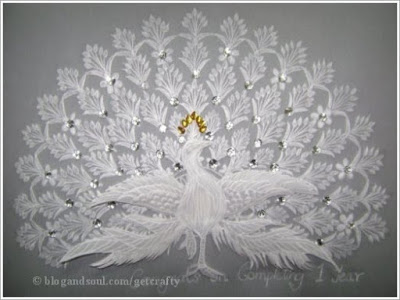
Madhavi Menon, this week’s contributor is a creative woman passionate about art and crafts. The above picture which is a greeting card she has created for The Keybunch team on their anniversary, is proof of that. We enjoy reading her blog Get Crafty, a place where contributors all over the world share their ideas and try new crafts. She sent us this beautiful peacock card with anniversary wishes on it. Thanks Madhavi! Jaya Venkatesh, a contributor to her blog has sent us this wonderful coffee painting tutorial in which she makes use of Tanya Yasmeen’s (another contributor) tissue paper technique as well. Hope you have fun trying this one! Over to Madhavi….
– Team Keybunch
I am more than delighted to be part of your anniversary celebrations. We are a team of 100 plus contributors in Getcrafty and 400 plus member in the forum Craftzine. From the team of getcrafty and craftzine, I wish you happy anniversary and many more such wonderful anniversaries ahead.
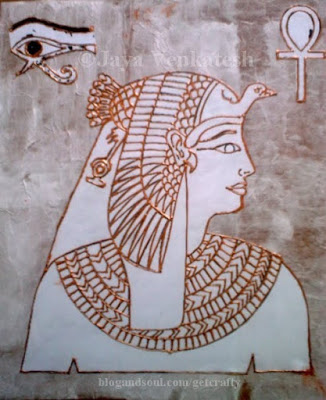
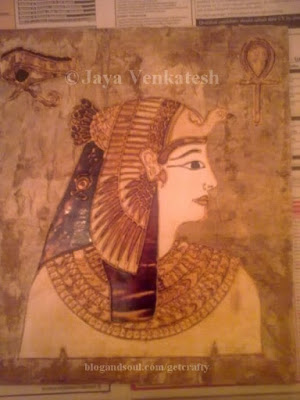
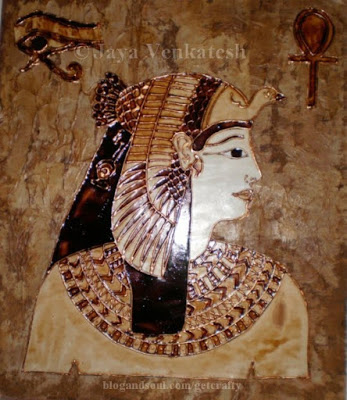
Materials Needed: Plywood / MDF board Fevicryl Glue ‘N’ Gloss Fevicol or White Glue Egyptian Design photocopy Fevicry l 3D Outliner – Copper / bronze Instant Coffee Powder Tissue Papers Brushes.
Method: Take the wooden board and smoothen it with sandpaper. Mix Fevicol with water to make it easy to apply with a brush. Apply this fevicol mix on the board fully in easy strokes with a flat brush. Start laying a tissue paper on it when it is wet. Cover the board with 2-3 layers of tissue, using more fevicol mix. Allow it to dry 3-4 hrs. Cut out the design neatly (I have taken a Egyptian queen and a couple of Egyptian symbols here). Stick these designs on top of the tissue covered board using fevicol. Mix fevicryl glue ‘n’ gloss with water in 1-1 ratio and apply it in even strokes with a flat brush on top of the design. Allow it to dry for 2 hrs. Outline the entire design with the 3D outliner. Allow it to dry for 15-20 mins.
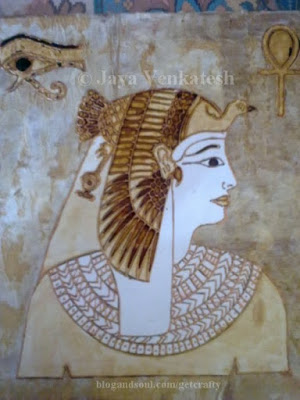
Mix a little coffee powder with water to get a light brown colour and apply it all over the board. Allow it to dry a little. Now we can start giving different shades of coffee colour by using a few drops of water if u want dark colour and a ½ spoon of water if u want lighter shades.
The background needs minimum 3 coats of light coffee colour to give a nice finish. The tissue gives a textured effect and looks like a old parchment or an old wall painting.
Tip: Adding a drop of glue ‘n’ gloss to the coffee mixture makes it dry faster and gives a glossy finish.





Gosh!!! What a lovely post Madhavi!!! You sure make it sound super easy…
I'll try this for sure… Thanks so much for sharing this… Sharon & Rekha!!! Well done again!
Hey Patricia…thanks again.
Madhavi, Jaya, Tanya and all the wonderful contributors on the Get Crafty blog – you guys do super work! I love the share and grow idea that you guys practice…and thank you so much for being a part of our anniversary celebrations.
Sharon
Absolutely fabulous post, Madhavi. Really enjoyed reading it 🙂 Am now heading over to Get Crafty to check that out 🙂
lovely tutorial….thanks,…
Hi All, Thanks for your comments everyone… I appreciate them very much….
This is a fun little tutorial. I'm not sure if you realize how many artists use coffee as an artistic medium . . . I've even written about them in my Blog about artists who paint with coffee as an artistic medium. If you are interested in finding out more about these artists check out http://www.uncommon-grounds.blogspot.com for pictures and lots of information.
Another artist who paints with coffee can be found at http://www.nosuchanimal.net . . . enjoy!
Madhavi : Great post…lovely tutorial…really enjoyed reading it
Sharon : Thanks a ton for introducing us to Madhavi…
Amazing. What a lovely painting. Its appreciable the way it has been presented step by step by giving the wonderful description alongwith the pictures.
Nice article and liked the way it is presented…. between it really looks like a antique piece!